Sunday, November 28, 2010

Lemon Cupcakes and Thanksgiving Fun!

How was your Turkey Day? I had such a great Thanksgiving! My parents and my sister and her family came out, risking the drive in the snow. I am so glad that they did. We enjoyed every second. My sister has a little boy and a little girl and we had so much fun entertaining. We ate, went to the zoo, ate, went to the Children's Museum, ate, shopped, ate, went out to eat, and...did I mention EAT!!! We are all such gluttons! Any dull moment, we got out leftovers and stuffed our faces. Then we complained the whole time about being full, gassy, etc...you don't need ALL the details! :) While they were here I made Lemon Cupcakes for a friend's daughter's baptism. I kept the frosting white and used pearly white nonpareils. They were so simple and pretty looking and what a hit! They are so moist and fluffy I compare them to angel food cake! This recipe rocks...MAKE THEM!!!

Lemon Cupcakes
Source: Our Best Bites

In your shopping cart you need:
1 1/2 cup (three sticks) of butter
3 cups cake flour (no substitutions or they will not be as light and fluffy)
1 tsp. baking powder
1/2 tsp salt
1/2 tsp. baking soda
2 cups sugar
5 large eggs
2 tsp. vanilla extract
4 Tab. freshly squeezed lemon juice
Zest of 2 lemons (zest before you squeeze em! :) )
1 cup buttermilk

Put your apron on and ...

Preheat oven to 325 degrees. Line 2 muffin tins with cupcake liners.

In the bowl of your mixer...beat butter and sugar for about 4 minutes till it is light and fluffy and white. While butter and sugar are mixing, sift together flour, baking powder, salt, and baking soda in a medium bowl. Set aside. Add eggs one at a time in mixer to butter and sugar while it is running. Beat in vanilla, lemon juice, and lemon zest.

With mixer on low alternately add flour mixture and buttermilk until fully incorporated.

Fill cupcake liners almost to the top. Bake about 20-25 minutes until toothpick comes out clean. These cupcakes are nice and flat...they are not supposed to have a round top...so you haven't done anything wrong! Remove from oven and frost with cream cheese frosting or lemon buttercream.


November 29th Family Night Treats

Don't forget to click on the Weekly Menu tab in the navigation bar to see what delicious sweet I am offering this week. Brown Sugar and Spiced Sugar Cookies! Yum! Click on the Weekly Menu tab for pricing and details!!!

Also this week: The Bakery Box will be participating in the Craft Fair at Walnut Hills Elementary from 10- 2 pm. Come and buy some goodies and support a local school and its parents! Hope to see you there! Mention my blog and I will give you a discount!!!

Wednesday, November 24, 2010

Happy Thanksgiving!!!

Holy Cow! Did anyone else out there have a day like mine? I spent the morning having 8 children here to play, helped them make pizza and roll-out cookies, made three dozen rolls, delivered rolls to three people, made cupcakes, cookies, went to Costco, Walmart, Sunflower Market, bathed three little boys, brined a turkey, cleaned the whole house from top to bottom, and still have things on my to-do list that I haven't crossed off yet...but WHO cares???!!! Tomorrow is another day and I am SO grateful to be spending it with family! What will you be doing? Will you hit up Black Friday? Ohhh...you will be seeing me racing for the $25 Leaspster!! Good Luck, eat lots, and more this weekend!

Tuesday, November 23, 2010

Oldies but Goodies!

Is everyone else so excited and exhausted busy getting ready for Thanksgiving?! What are you making? Please leave me a comment and let me know your favorite dish you are making! Right now, I am so excited to start some fancy shmancy sugar cookies for the big day... turkeys... gobble, gobble! I will be posting these along with a video showing a quick and easy tutorial on royal icing...you guys will love it. It is so fun! I promised you last week to post some pictures of a Halloween cookie order I did. I LOVED how they turned out. I shipped them in the mail back home for a Halloween carnival for my niece. Just looking at the pictures, makes me want to get started on my Turkey cookies!

Monday, November 22, 2010

Whoopie Pies!

So, I predict that the next fad in the dessert industry will be...drumroll please... whoopie pies! What isn't to like about cookies sandwiched together with frosting...HELLO! I hear there is a whole book dedicated to whoopie pies. I WILL be buying it and I WILL be sharing all the best recipes with you all! I wonder what kind of delicious Christmas flavored version there could be! Here is an amazing Fall version. They were a hit with my boys who usually don't love pumpkin flavoring!! And the addition of the maple syrup to the cream cheese frosting is a .... a...
I am at a loss for words! You have just got to try it!


Pumpkin Whoopie Pies With Maple Cream Cheese Filling

I found these delights over at Brown Eyed Baker

In your shopping basket you will need:

For the Whoopie Pies

3 cups flour

2 Tab. cinnamon

1 teaspoon baking powder

1 teaspoon baking soda

1 teaspoon salt

1 teaspoon ground ginger

1/2 teaspoon ground nutmeg

1 cup sugar

1 cup brown sugar

1 cup veggie or canola oil

3 cups pumpkin puree-that is one of the large cans

2 eggs

1 teaspoon vanilla extract

For the Maple Cream Cheese Filling

3 cups powdered sugar

8 oz. cream cheese, at room temp

1/2 cup butter, at room temp

3 Tab. maple syrup

1 teaspoon vanilla

Put your apron on and

1. Preheat oven to 350 degrees.

2. Whisk together the flour , cinnamon, baking powder, baking soda, salt, ginger, and nutmeg in a bowl (not your mixing bowl)

3. In your mixing bowl, mix together the sugars and oil. Add pumpkin and whisk to combine thoroughly. Add the eggs and vanilla and whisk until combined.

4. Gradually add flour mixture to the pumpkin mixture.

5. With a large spoon, drop by the tablespoon on silipat lined cookie sheets, about 1 inch apart.

6. Bake for 10 to 12 minutes. Cookies should be firm to the touch.

Let the cookies cool completely before you frost them...or they will melt the frosting!!

To make the frosting, make sure the butter and cream cheese are room temp. To be honest, I always forget this step and am too impatient to wait. Then my frosting is lumpy. Be better than me, follow the directions!!

To make the frosting, combine the above ingredients in a mixer for about three minutes till smooth!!! Assemble sandwiches and ENJOY!!!

Sunday, November 21, 2010

Family Night Treats

Don't forget to check out The Bakery Box every Sunday to see what delicious treat I will be offering for Monday night... Family Night! Click on "weekly menu" in the navigation bar at the top of my blog under the header!

Tomorrow I will be offering Pumpkin Whoopie Pies with Maple Cream Cheese Frosting. They are as good as they sound! I took these bad boys to a Halloween party a few week ago and they were a huge hit! Prices are only $3 for a half dozen cookies and $5 for a dozen. Call now!

Saturday, November 20, 2010

Dalmatian Cupcakes Part II

First of all, if you are reading this post and haven't read its' prerequisite...read Part I below. Then come back to this post for the "riveting" conclusion of the pups! Part I was done the night before the big party. I started at 9:30 pm and worked till 2:00 am. I made 36 dalmatian cupcakes. I feel it is important to notify any of my millions of followers out there of the time these took before you might get crazy like myself and undertake these bad boys. Part II steps are below and really only took about 2 hours. So total time commitment was about 7 hours. But, some things are worth dedicating the time to. Since I didn't LOVE the result...don't know if this project was...but maybe you will feel differently. Leave a comment and let me know your opinion!

Okay, where we left off yesterday was with the mouth of the doggies intact, the snouts constructed, and the cupcake frosted over. Here we go... I know you are all on the edge of your seats I am sure...
As you can tell by the cotton ball holding up the mouth of one injured pup in the above photo, some of my dalmatian's mouths didnot hold. Dang it! This is where my breakdown occured. I was able to re-glue most of them with frosting. I felt like a surgeon at work. The pressure was on. :) After repair work, I used black frosting to attach little black jellybeans as the noses.
Forgive some of these photos. I did not have my professional photographer with me this day. This was all me and my fancy shmancy $100 camera baby! OK, next was the jelly bean eyes. And adding spots. This is were I really was struggling. The spots were camoflogauging the eyes. I tried bigger eyes, smaller eyes, marshmallow eyes, big spots, smaller polka dots, and didn't love any result. So, I stuck with the instructions and used the jellybeans.

Next to come were adding the ears. These didn't want to stay on and I decided to finish all the dogs without the ears and add them on at the party...much easier for travel. So I cut the ears out and brought them along. The book Hello Cupcake! (link provided in yesterday's post) called once again for Famous Chocolate Wafers for the ears. Who the h#$% carries these?! Anyways, I found some chocolate mint cookies that worked okay. They were fancy shmancy and expensive though. I ran out and had some generic oreos on hand. These actually worked just dandy. I separated the cookie, scratched off the frosting, and cut each cookie like a ying yang symbal to create the ears. Then I attach them to the side shoving them into the cake part of the cookie and you have got your self a funky cute looking dalmatian! Woof!

Friday, November 19, 2010

Dalmatian Cupcakes Part I

I have a dear friend Annie who asked me to bake up some cupcakes for her daughter's fireman- themed birthday party. She just wanted normal yummy cupcakes. But she is also the best party-thrower I know and always tries to tie in each detail of the party to the theme... soo... being the genius I am...I complicated things. I decided to try out something from the book Hello, Cupcake. Ummm...this is where things got interesting. This book is AMAZING and most of it really does seem do-able. However, it was a big undertaking for a beginner gal like myself. Half-way through the process I was cracking up at the final product one minute and near tears the next. Isn't it frustrating when you expect perfection and work so hard for it, only to be deeply disappointed by the result? Has this ever happened to you? Anyways, here are some quick snapshots of the journey. I will post recipes later. I used a vanilla cupcake and a buttercream frosting recipe. Both were pretty darn good...
First, I frosted all the cupcakes with buttercream. My crumb coat was pretty dry and I think this is where the trouble began. Things were not sticking. In this picture I have inserted little cut cookies for the mouth of the doggies. (I used Oreos from the 100 calorie packs.) The book has you using a cookie that you can not find anywhere...trust me, I looked...EVERYWHERE!
I cut the corners off of each cookies to give them the rounded shape. IF you attempt this microwave the cookie for about 10 seconds. It makes it easier to cut. Then stick the cookies deep into the cupcake...some of mine fell off later, so make sure your cookie is in good.

Next step is forming the snout of your little pups. As you can see the book has you using a big marshmallow and 2 miniature marshmallows for this step. The big marshmallows are cut in half. I used a little dot of frosting for each mellow as a "glue."
Here I have added the tongues. The book calls for pink starburst. For the amount of cupcakes ordered, I figured I would have to buy three bags. To save cash, I found little pink pigs at the candy store that I butchered to make the little doggie tongues. That is...I cut off their feet, tail and head. Once again, a little bit of frosting holds it down. Time consuming!

Last, the book says, frost over everything but the pink tongue. Easier said than done...spreading frosting with my butter knife was not working. It was moving the marshmallows and mouths too much and just didn't look good. I decided to try piping it out. I used the number 104 tip to cover the cupcake. It was so much easier, but the end result was not the perfectly smooth dalmatian I see in the book. HOW do they do that? Oh well...mine had "fur." Then the real fun began placing eyes, nose, spots and ears on. Some of them looked like cows, some dalmatians, and all looked eyeless. You will have to log on tomorrow to see the rest of the steps and the end result! Till then..

Thursday, November 18, 2010

Coming Soon...

Sometimes I find myself to be a gal not quite grounded with the real world....always visualizing everything in a perfect way and then having a hard time reaching this perfection. The dalmation cupcakes I just spent two days of my life on were something like this. In my head I could just hear them barking. However, their creation was something of a pain in the a@$ trial and the result was humorous not as expected. Everyone assured me these little puppies looked fine...but they also didn't see the picture in the book of what they should look like. Well, I am learning and I think life is way more interesting with mistakes out in the open...so stay tuned tomorrow for the story of these cupcakes and pictures.

Wednesday, November 17, 2010

Filled with gratitude...and good soup

'Tis the season to count our blessings, right?! And this Thanksgiving I am so thankful for my friends. I grew up in the military. I don't know if it was all the moving, but I don't really have friends from childhood. I am not a great correspondent and my friendships tend to blend into the background until, years later, I live with the regret of letting it happen. 4 years ago my husband and I moved away from all family and friends...into the great world of Denver Colorado. I was bored out of my mind, stuck at home with a baby and no friends. Slowly I began making friends and now, years later can not imagine life without them. My friends are the kind of gals that you count down the hours to hang out with them and just go to dinner. They are the kinds of friends who will bring you over a tub of sour cream when you are out and stuck at home with a bunch of kids. My friends are the kind of gals that support me in my strange endeavors and act like I am the best darn teacher, baker, friend, homemaker, etc. they ever did see. When I am having a bad day they show up with a double cheeseburger and a very large diet coke. Does anyone else out there agree that a diet coke can cure the worst day ever? My friends are the kind of friends that even in a new state, they are so excited for each and every small success in my life. I am not an emotional gal, but just writing this is making me a little weepy. Where am I going with this post? Well, I had two of these friends over for dinner on Sunday and served them this soup. Both are begging for this recipe so here goes...


Split Pea Soup
Source: my mother- Jenise Keith - she has served this with Christmas dinner the last couple years and let me tell you...even if you don't like peas you will LOVE this soup!!


1 package bacon

1 16 oz. bag split peas

2 celery stalks

1 large onion

8 cups water

2 potatoes, peeled and cubed

2 tsp. salt

1/4 tsp. pepper

3 beef bouillon cubes

1 bay leaf

1 cup cream


Cook bacon. Take out of pan and set aside. Cook onion and celery in bacon fat. Move onion and celery to saucepan once tender. Add rest of ingredients in sauce pan except for the cream and bacon. Simmer for 45 minutes. Remove the bay leaf and blend in blender till smooth and creamy. I have a small blender and have to blend mine in three parts. After blended return to pot and stir in cream. Garnish with chopped bacon. DELISH!!!


Tuesday, November 16, 2010

Royal Icing Cookies!!!

As far back as I can remember, I have had a love for sugar cookies. The whole process to me is so fun. Every year at Christmas time, my sisters and I would help mom make sugar cookies. We would pop in Amy Grant Christmas (the best Christmas album EVER next to Lee Greenwood Christmas...yes...LEE GREENWOOD) and roll, cut, bake and decorate. THAT is Christmas!! I remember making sugar cookies as a kid and having this perfect vision of decorating my cookie to look like the kind of cookies you see in the magazines. Mine always ended up sloppy and covered in three different kinds of sprinkles. Half the time you couldn't even tell what shape the cookie was! But what fun! I still love sugar cookies, and being the obsessive baker I am, bake sugar cookies for every holiday. And, just recently, I have figured out why my cookies never looked "magazine perfect" with details and smooth icing....

Wait for it...

Royal Icing!!! Royal Icing is an art. It requires the right supplies, patience, timing, and planning. It isn't like the delicious buttercream we are all accustomed to...it won't make your mouth water...but WOW!!! It sure gives you THAT look. Those stares from people saying, "where did you buy these cookies?" And it is a chance to take pride in your baking and gosh darn it to actually be able to tell what shape cookie cutter you actually used.!!!

I will be posting a tutorial on royal icing next week as I make Thanksgiving turkey cookies for my Thanksgiving dinner! Gobble gooble. Till then, here are some pictures of cookies I have done and experimented on in the past couple weeks...


These were my very first attempts. I am learning more and trying harder designs now-a-days. I made some very detailed, super cute Halloween cookies that I will share with you soon. I must give credit where credit is due. Annie at Annies Eats has an amazing royal icing tutorial on her blogspot. I learned the craft from her and used some of her designs...very simplified for my first attempts. Mine are very humble in comparison but...someday... Check her out... she is one of my blog heroines! You will definitely find something you LOVE there!


Monday, November 15, 2010

Dark Chocolate Cupcakes with Peanut Butter Frosting


On Thanksgiving Day, these babies will be on my buffet table for my family. I don't know about you, but I am a firm believer that there HAS to be something chocolate on the dessert table...ALWAYS. No matter the occasion, holiday, location, NO exceptions. This is my favorite chocolate recipe I have made lately...the richness of the dark chocolate moist cake is absolutely mouthwatering paired with the peanut butter frosting which is so light and fluffy. I have family coming into town and can't wait to entertain. I've got my menu planned and anticipate trying some new recipes. I promise to share the good ones! Well, these beauties are dedicated to Ross, my sister's husband who loves chocolate/peanut butter baked goods. Ross- these bad boys will be waiting for you...don't lick the screen...
Dark Chocolate Cupcakes with Peanut Butter Frosting
Source: Brown Eyed Baker
Yields:12 cupcakes
8 Tab. (1 stick) butter, cut in pieces
2 oz. bittersweet chocolate, chopped
1/2 cup cocoa powder
3/4 cup all purpose flour
1/2 tsp. baking soda
3/4 tsp. baking powder
2 eggs
3/4 cup sugar
1 tsp. vanilla extract
1/2 tsp. salt
1/2 cup sour cream
Preheat oven to 350 degrees. Line muffin tin with baking cup liners.
Combine butter, chocolate, and cocoa in medium heatproof bowl. Set bowl over saucepan of simmering water. Heat till butter and chocolate are melted and whisk until smooth and combined. Set aside to cool until just warm to touch.
Whisk flour, baking soda, and baking powder in small bowl to combine.
Whisk eggs in a second bowl to combine; add sugar, vanilla, and salt until fully incorporated. Add cooled chocolate mixture and whisk until combined. Sift about one-third of flour mixture over chocolate mixture and whisk until combined; whisk in sour cream until combined, then sift remaining flour mixture over and whisk until batter is well blended and thick.
Divide batter evenly among muffin cups. Bake til knife comes out clean...18-20 minutes.
Cool cupcakes in muffin pan for 15 min. Then remove from pan and let cool completely on wire cooling rack. Frost when completely cool.
Peanut Butter Frosting

Source:Barefoot Contessa

1 cup powder sugar
1 cup creamy peanut butter
5 Tab. butter, at room temperature
3/4 tsp. vanilla extract
1/4 tsp. salt
1/3 cup heavy cream

Place the powdered sugar, peanut butter, butter, vanilla, and salt in the bowl of your electric mixer fitted with the paddle attachment...not the whisk. Mix on medium speed until creamy, scraping down the bowl with a rubber spatula. Add the cream and beat on high until the frosting is perfect and smooth! Yum... don't lick it all off the paddle...save some for the cupcakes!


Sunday, November 14, 2010

Aunt Niecey's Rolls


My family is a little set in our ways. Why try anything new if you already have the best? Roll recipe that is... I am talking about years and years of my Aunt Denise baking her de-li-cious homemade, melt in your mouth, always fluffy, and amazing crescent rolls. Rolls are her assignment for EVERY family event. And they always steal the show. My husband can eat like 6 of them with his dinner...it is quite the feat. After trying to find MY own perfect roll recipe (none compare) I gave up and called my Aunt "Neicey" for her recipe. Want to know the secret? They are Lion House Rolls. To learn all about The Lion House check it out here. They are famous for their recipes. This recipe requires time...two separate times for the dough to rise. But it is SOOO worth it. Look out here they come...


Aren't they beautiful. AND... I offer these rolls anytime for friends and customers. Check out the weekly menu tab. A dear friend of mine Paula Dean told me you can freeze freshly made rolls, pull them from the freezer a few hours before meal time, and warm them up in the oven. SHE would never steer you wrong. Sure enough...I tried it and WOW! Tastes exactly like freshly made,-slaved-over-the-stove -all -day- rolls. Paula, once again, you have changed my life for the better. And... without further ado...here is the recipe...

Lion House Rolls

2 packages dry yeast - if you don't have packages...this is 4 tsp.

1 egg

2 c. warm water

1/3 cup sugar

1/3 cup butter

2 1/2 tsp. salt

2/3 cup dry milk/powdered milk

5-6 cups of flour

Combine the yeast and water in your mixer and let it sit for awhile, five minutes or so until it is bubbly and you can smell the yeast. Add the sugar, butter, salt, dry milk, egg, and 2 cups of the flour. Beat till smooth and there are no butter chunks left.

Add 2 more cups of flour, 1 at a time and beat until smooth. Add still another cup of flour and mix until it is well mixed in. Take dough out of mixer at this point and knead on a floured surface till it is not sticky anymore and it is smooth and satiny.

Gather dough in a ball and put in greased bowl. Let rise in a warm place until triple in bulk. My mom would always put hers by the fire place. Mine go in a room with the door shut and a space heater on. This step seems to take about two hours for me.

On a floured surface, let the dough rest for about 10 min. This lets the gluten in the dough relax a bit and lets the dough roll easier without springing back too much. I roll mine out in a big circle like a pizza dough and cut it into triangles like cutting a pizza. Roll each triangle starting at the short end to the skinny point to make your crescent rolls. You could also do clover leaf rolls by rolling dough into small balls and dropping three into each muffin tin. These turn out really pretty too.

Place on greased baking sheet. I swear by Silpat!!! Brush with melted butter. And let rise about another hour and a half til puffy.

Bake at 400 degrees for 12-15 min. My oven is CRAZY and only takes 9 minutes...so check your rolls early the first time!


Thursday, November 11, 2010

Under Construction!

What an exciting day! The Bakery Box is under way! Hmmm...did I just rhyme? Too much Dr. Seuss to the boys. I have lots to post and details to add to this blog over the next couple days to get it up and running. Please contact me directly for now with all orders. Coming soon...Thanksgiving rolls, turkey cookies, dalmation cupcakes and more. Tune in to see and SPREAD THE WORD!!

Wednesday, November 10, 2010

About Me


Hi! I am Lindsey Mendenhall. I am a crazy lady who loves to be busy. I have three little boys that run me ragged every day... I mean that in a good way of course! I have been owner/teacher of a preschool in my basement for three years now and thought I would try to get another business up and running. I think everyone has something on their bucket list that is totally do-able NOW! For me, it was cake decorating. I don't know anything about it, have no school, classes, or training. Here I go! Watch me "develop" this talent as I fill orders for my very trusting and supportive friends and lets learn together!


Tuesday, November 9, 2010

Weekly Menu


I am offering Family Night treats! Here is how I want to attempt this:

Every Monday I will offer treats for your family night. Save yourself the time, the trip to the store for the missing ingredient, the cleanup and the leftovers that will tempt you till they are gone and order through The Bakery Box! Order via email, leave me a comment or call me to place a order. Family night treat pickup is 2:00-3:30 unless scheduled through me. Free delivery is available around 4:00! Prices are $3 for half a dozen and $5 for a dozen. This Monday, on the menu is:

This Monday, March 7th, I am offering Green Mint Fudge! Or/ And sugar truffles. 5 fudge squares for $6. 1 dozen truffles for $6.

Also on the menu this week are crescent rolls $7.00 a dozen. Available anytime. Call for pickup. Save yourself the hassle and make soup night a little more home made! Pick these up frozen anytime- all ready to de-thaw and reheat for dinner! They are completely fresh and fluffy and PERFECT!


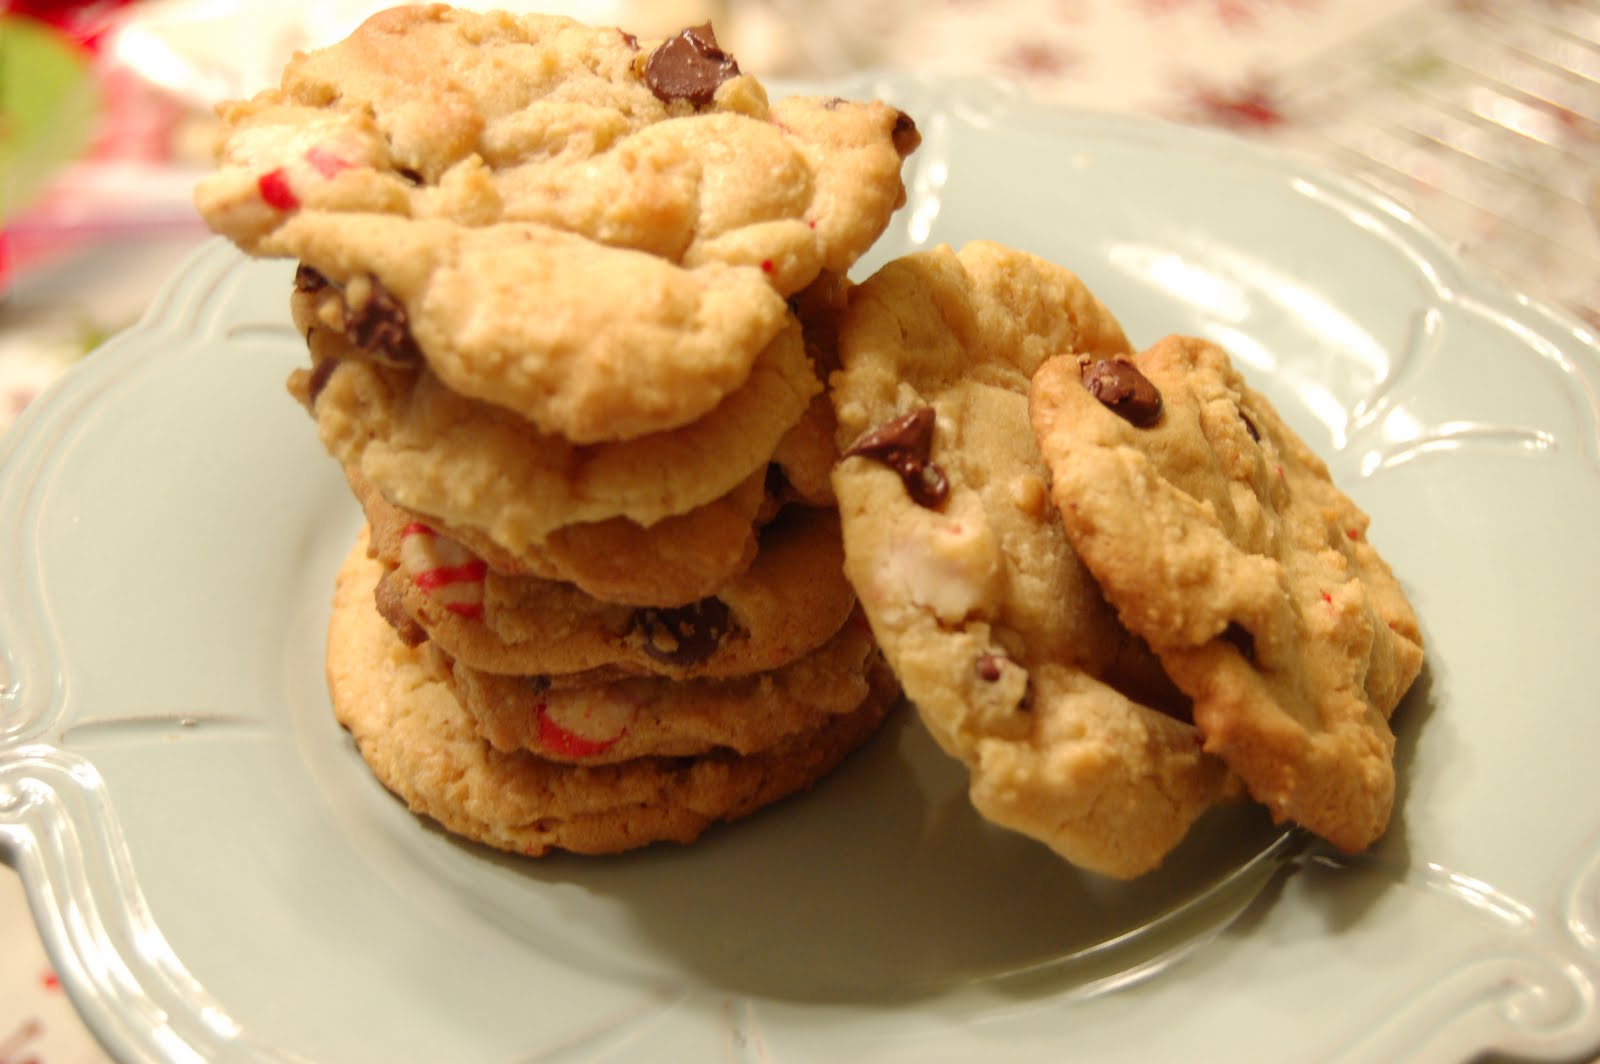
Also available now...Chocolate Chip Cookies. Call an hour before and I will bake them fresh for you! Or you can order the frozen dough to bake at home at your convenience. Prices are $4 a dozen. A batch of dough is about a dozen and a half cookies.

Sunday, November 7, 2010

Tutorials

Related Posts Plugin for WordPress, Blogger...