Monday, January 23, 2012

Homemade Oreo Cookies

I will let you in on a little secret about me. I know alot about copying and printing. Why? I worked at Kinkos for four years. After my mission toRomania until a few months after Ben was born you could find me me in the blue apron full time. I am left with strange knowledge about how to unjam a machine, how to create a stapled booklet on a copyer, and how to blow up an image 400%. BUT...the biggest contribution Kinkos gave me was this recipe. One day, a fellow coworker, brought in these delights. My tastebuds were singing. Ohhh....soft chocolate-y goodness! After seeing the reaction from the guys there, I begged her for the recipe. I was still single and needing some delicious cookie recipes to make me a little more beautiful in the eyes of a young man. Mindy, if you are out there.... THANK YOU, THANK YOU, THANK YOU. These truly are my hubby's favorite cookie on my holiday gift plate each year. His favorite way to eat them is with the frosting edges rolled in crushed candy cane. YUM!

But, you can roll them in sprinkles or crushed cookie crumbs. Use your imagination and make these your own. My sister in law, Emily, loved the softness of these cookies, but isn't a chocoholic, so she tried it with lemon cake mix. They were almost as yummy as the chocolate. Experiment and see the way you like them the most. And let me know what you try and works...

Here is the original recipe my Kinkos coworker gave me...

Homemade Oreo Cookies
Source: Mindy

2 boxes devils food cake mix
4 eggs
1 Cup Crisco
1 Container Whipped Cream Cheese Frosting (*see note)

Mix first 3 ingredients in your mixer. This batter will be super think. Almost like bread dough. So thick I broke 2 hand mixers with this recipe and Paul went out and bought me my kitchenaid. Once the dough is well combined, roll into 1 inch balls for small cookies, bigger for larger cookies. Experiment and see what size you like. Bake at 350 degrees till cookie starts to look cracked on top. In my oven the perfect time is 9 min. Cool completely, frost, and sandwich together.

* You all know my feelings on frosting from a container...YUCK-O. However, this is the one exception for me for some reason. The container frosting just works for this cookie. That being said, I have used homemade cream cheese frosting and it is FANTABULOUS!!!




Sunday, January 15, 2012

Still Alive!


No, this cake didn't take a month to make....just a month to post. The design is very simple, I am still not the most creative person, just a good copier of the geniuses out there. Thank you Pinterest! It was a double layer chocolate cake with marshmallow fondant over the top. I used a Christmas tree cookie cutters to do the trees, and then outlined and detailed with royal icing. It was for a church activity. They didn't know that I had included a little surprise with this order. Whoever finds the little piece of paper is the winner! (Embarrassing)


Our family Christmas was legend "wait for it" ary. During which I discovered the glories of How I Met Your Mother. Which, if you have watched, you will understand my "wait for it" joke. Or...you think I am a nut. It was legendary for our family because my littlest sister got engaged. SO FUN! Lots of planning and girl talk and remembering this exciting time in my own life. Congrats Sis!


Then I returned filled with goals and resolutions for the new year. I started a cleaning/ organizing/purging kick here at my house that has taken up every free second of my time and my hubbies. Every day I am adding to his "to do" list. He comes home at the end of the day, helps get kids to bed, and then marks stuff off of it, only to find more in its place the next day. Bless him! And...after three weeks of pushing our selves, our house is looking WAY better. Now, closets aren't falling in on us, the garage has work space, there is room for new Christmas toys, etc. Back to regular life again...which means....baking again. Good for my mental stability not good for my healthy resolutions. Oh well, one thing at a time, right?!

Tuesday, December 13, 2011

Christmas Past

Baking makes me happy. Saturday was spent listening to Christmas tunes and baking thirty Christmas plates for neighbors, clients, and church friends. It was a BLAST!! Most dread such things, not me. Guess I am in the right bizness. I have a few new Christmassy recipes I am dying to try, but there is nothing like the good old classics you make and look forward to year after year. I thought I would share some of them with you. Try some yourself or order some today...I am still taking orders! Here are some ideas starting with my five favorites and then listed randomly after that


1. Sugar Cookies


2. Hot Chocolate Chip Cookies


3. Eggnog Bundt Cake


4. Licorice Caramels


5. Oreo Truffles


Gingerbread Waffles


Gingersnaps


Lion House Rolls


Chocolate Dipped Orange Slices


English Toffee


Marshmellow Fudge


Sugar Cookie Truffles


Sunday, December 4, 2011

Cranberry Crumb Muffins

It is December! Time for oranges, cranberries, gingerbread, cinnamon, mmm... I LOVE it!!! Time for baking and listening to Amy Grant sing about the season. We put our tree up on Black Friday, are down shopping, will have Christmas cards out this week, and am baking and delivering my holiday cookie plates this Saturday. I think it will be about 30 this year. Not to bad. Going to make all my favorites toffee, fudge, sugar cookies, peanut butter kiss cookies, and one of Paul's favorites homemade oreo sandwiches rolled in crushed candy canes. I have been experimenting with cranberry muffin recipes. One was cranberry upside down muffins. One was a cranberry orange combination, and one was a cran-apple combo. These were my favorite and they were probably the healthier version. Next, I am going to try fresh cranberries in my waffles. Yummy! I will let you know how that turns out. Speaking of waffles, last year we tried these gingerbread waffles that were yummy...don't forget to try them this season.

Lemon Cranberry Muffins
Source: Eating Well

Put the following ingredients in your cart:

1/2 cup plus 2 tablespoons sugar, divided
3/4 cup nonfat plain yogurt
1/3 cup canola oil
1 large egg
3 teaspoons freshly grated lemon zest, divided
2 tablespoons lemon juice
1 teaspoon vanilla extract
1 1/2 cups white whole-wheat flour
1/2 cup cornmeal,
2 teaspoons baking powder
1 teaspoon baking soda
1/4 teaspoon salt
1 1/2 cups cranberries, fresh or frozen (thawed), coarsely chopped

Put your apron on and get bakin'...

Preheat oven to 400°F. Coat 12 muffin cups with cooking spray or line with paper liners.

In your mixer combine 1/2 cup sugar, yogurt, oil, egg, 2 teaspoons lemon zest, lemon juice and vanilla. Add in the rest of the dry ingredients. Gently fold in cranberries.

Spoon the batter into the muffin cups. Combine the remaining 2 tablespoons sugar and remaining l teaspoon lemon zest in a small bowl. Sprinkle evenly over the tops of the muffins.

Bake the muffins about 20 to 25 minutes. Let cool in the pan for 10 minutes, then transfer to a wire rack to cool for at least 5 minutes before serving


Tuesday, November 29, 2011

Salted Pumpkin Caramels- Our New Thanksgiving Delight

Every now and then, a holiday screams for a little something new to tease your tate buds. Something straying from the norm pie choices and family favorites. For our Thanksgiving day, these homemade salted pumpkin caramels were just the ticket. Same ol' fall flavors remixed into creamy, bite-sized melt in your mouth caramels.

I think I will make these for every Thanksgiving feast.

I have made caramels mutiple times. This was the easiest recipe as of yet. Follow the instructions and there is no messing this up. I can say this confidently because if there was a way to mess these up, I would have done it!

Salted Pumpkin Caramels
Source: Food 52
Makes 64, 1-inch caramels

2/3 cup unsalted pepitos (pumpkin seeds) (I didn't use these)
1 1/2 cups heavy cream
2/3 cup pumpkin puree
1 teaspoon pumpkin pie spice
2 cups white sugar
1/2 cups light corn syrup
1/3 cup good maple syrup
1/4 cup of water
4 tablespoons unsalted butter, cut in chunks
1 teaspoon lemon juice
3/4 teaspoon fleur de sel (sea salt)

Dry toast the pepitos in a skillet until they start to pop. (I skipped this part) Line the bottom and the sides of an 8-in square glass pan with parchment. Butter the parchment on the sides of the pan. I didn't have parchment, I used wax paper and it worked just fine. Evenly spread out the toasted pepitos on the bottom of the pan, on top of the parchment.

In a saucepan, combine heavy cream, pumpkin puree and spices. Get this mixture quite warm, but not boiling. Set aside. In a second heavy bottomed pan, with sides at least 4 inches high, combine the sugar, both syrups and water. Stir until the sugars are melted, Then let it boil until it reaches 244 degrees (the soft ball point on a candy thermometer). Then very carefully add the cream and pumpkin mixture, and slowly bring this mixture to 240 degrees on a on a candy thermometer. This can take awhile -- like 30 minutes -- but don't leave the kitchen, watch it carefully and stir it more frequently once it hits 230 degrees to keep it from burning at the bottom of the pan. As soon as it reaches the 240, pull it off the heat and stir in the butter and lemon juice. Stir vigorously so that butter is fully incorporated.

Pour the mixture into the prepared pan. Let cool 30 minutes and sprinkle the salt over the top. Let the caramels fully set (at least 2 hours) before using a hot knife to cut them into 1-inch squares and wrapping them individually in waxed paper.

Sunday, November 13, 2011

Peanut Butter Truffle Brownies

Well...the holidays are among us! Are you ready? I am going to get my Christmas cards printed this week. Last year I had my card sent out by the end of November. Let me tell you....this ROCKED in December when I was soooo busy with bakery orders. It felt great to have 90% of the shopping done and the cards sent before December even rang in. Especially since we are always in Utah the week before Christmas, December is a short month! But...bring it on...order away...I am ready for ya Christmas!I have, as always, been baking lately. We had company in town...twice. I introduced my parents to the wonders of pistachio cake. And got my brother in law Jared addicted to these sugar cookies. And my sister in law taught me her tips and recipes for homemade chocolates...YUM! I will share with you soon. In the meantime, here is one of our favorites!

Just looking at this picture makes me want to go bake a batch of these bad boys. These are probably my favorite peanut butter/chocolate recipe (with these cupcakes in a close second). My brother in law Ross LOVES chocolate and peanut butter. Val, you better make these for him...SOON! I got this recipe from my all time favorite blog, The Girl Who Ate Everything. Not only does she have the BEST recipes, but she is a really humorous writer and I actually read her posts...every one.


Peanut Butter Truffles


Brownie Base:
1 box (1 lb 6.5 oz) Betty Crocker® Original Supreme brownie mix
Water, vegetable oil and eggs called for on brownie mix box

Filling
1/2 cup butter, softened
1/2 cup creamy peanut butter
2 cups powdered sugar
2 teaspoons milk

Topping
1 cup semisweet chocolate chips
1/4 cup butter

Heat oven to 350°F. Grease bottom only of 13×9-inch pan. For easier cutting and prettier looking bars, line pan with foil, then grease foil on bottom only of pan.

In medium bowl, stir brownie mix, pouch of chocolate syrup, water, oil and eggs until well blended. Spread in pan. Bake 28 to 30 minutes until it passes the toothpick/fork test. Cool completely, about 1 hour. I always speed this up by sticking the pan in the fridge or the freezer.

In medium bowl, beat filling ingredients with electric mixer on medium speed until smooth. Spread mixture evenly over brownie base.

In small microwavable bowl, microwave topping ingredients uncovered on High 30 to 60 seconds; stir until smooth. Cool 10 minutes; spread over filling. Refrigerate about 30 minutes or until set. Store covered in refrigerator. (I take it out or the fridge about 15 minutes before serving. This allows the chocolate on top to soften a little)


Monday, October 24, 2011

CUTE Spider Cookies

One of my fav. customers requested spider cookies. Her daughter plays lacrosse for a college whose mascot is the spiders. We found these cookies from the decorated cookie and they were perfect. One problem...she and I seeaarcheed the internet. (seeaarcheed means we devoured the internet for many hours) Yet we could not find this cookie cutter. In fact, we couldn't find a cute spider cookie cutter no matter how hard we tried. They all had fangs, or were a strange angle of a spider. I was prepare to free hand cut out each cookie when I had a thought...there has to be some way to make a simple cookie cutter. Oh...there is. Check this out! Paul had me this great shape in under 30 minutes for the grand total of $0. (we had all the supplies needed in our garage!) Paul actually had fun doing this project and told me never to buy another cookie cutter again. Check out the tutorial and give it a swirl!

Tuesday, October 11, 2011

Sponge Bob...and a yellow cake recipe


Where would we be without Sponge Bob? Sponge Bob represents pure stupidity in children's television...yet we all laugh away. I, myself, have watched one episode (it was enough).

This cake, however was so fun to do! It made me almost like Sponge Bob for a brief second...almost. I covered the whole cake with yellow marshmallow fondant, added a stripe of white and brown along the lower half, added eyes and spots, and a red tie, and bada bang, got yourself a Sponge Bob. I outlined all the details with black royal icing.

Last year I made a Dora birthday cake for this customer. One layer was a yummy homemade chocolate cake and the other layer was a doctored yellow cake mix. This year they requested yellow cake. They said they have been thinking about my moist yellow cake for the last year. Ha-Larious! So.....here is a simple recipe for what they say is AMAZING yellow cake! I have tried three or so homemade yellow cake recipes. This easy one is comparable to homemade.

Doctored Moist Yellow Cake
Pretty much made up by me from two other recipes I have tried

1 box yellow cake mix
2 eggs
1 cup sour cream
1/2 cup milk
1/3 cup vegetable oil
1 tsp butter flavored extract or lemon or vanilla ...whatever you want

Tuesday, October 4, 2011

Halloween...Revisited

I have never been a Halloween person. I never didn't like it, I just never thought much of it. It was kind of just something that happened before Christmas. Now, having kids, I look forward to each holiday...and try to make them special, even strange ones like St. Patricks's Day or Memorial Day. My oldest boy, Ben, is OBSESSED with Halloween. He loves to help "decorate" the house, read Halloween picture books, talk about different costumes...to the point of driving his dad and I a little bonkers! But...wow...Halloween is soo fun now!

Here are a few of the treats I made last year to check out, order, or bake yourself. I also have a few new fun ideas to try in the next few weeks...can't wait to share with you!

Ohhh...here are the Halloween sugar cookies I decorated last year...


ohh...and then there are pumpkin whoopie pies...yum, yum!


Ad who doesn't like a cupcake... how 'bout these chocolate bat-topped cupcakes?


Or Monster cupcakes?


Tuesday, September 27, 2011

Mascot Sugar Cookies


These were the most difficult sugar cookies I have done as of yet. As you can see in the picture they were of the school mascot for Kansas University. The cookie cutter I was provided with was pretty vague and lacked detail. I had to free hand the contour of the bird and the details. You can see a little of the actual mascot on the cute blonde's shirt. Hope she doesn't mind going public!! What a great, original idea for tailgating. Mascot cookies. My customer packed these on an airplane and ate these cookies four days later and said they tasted great. Yeah for sour cream in my recipe!


Sunday, September 25, 2011

Everyone's Favorite-Chocolate Rebel Bars

OK...this is my dad's all time favorite treat. You know how they say you marry someone like your father? Well....Paul actually differs from my dad a lot...but these get his vote. Whenever I throw out the question, "What treat do you want me to bake?" he answers ...."Ohhh...chocolate rebel bars. Now...I must point out that I saw these on a blog a few days ago and they were called Chocolate Revel Bars. Is it possible that my family has been saying this wrong for like 20 years?!!! Or, did this other chick get it wrong?! Oh Well...I am a rebel and will therefore keep calling these Chocolate Rebel Bars. So... boo-ya, there ya have it.

I would like to give a grand excuse for my lack of baking lately, but it boils down to this... I am a Pinterest addict. I have a talent of wasting my designated "free" time every day on this new "hobby." I can look at people's outfits and furniture choices for hours. (I don't let myself....thank goodness or I would get nothing done!) I try to limit my daily computer time to about an hour. I promise to turn off Pinterest a little more and blog instead!!! But I do have some AMAZING looking treats I have pinned. I will try them and let you know if they are worth your time!

Chocolate Rebel Bars
Source: Jenise Keith

Throw the following ingredients into your shopping cart...

For the crust: 1 cup butter
2 cups brown sugar
2 eggs
2 tsp. vanilla
3 cups oatmeal
2 1/2 cups flour
1 tsp. baking soda
1 tsp. salt

For the fudgey layer of goodness...
1 can sweetened condensed milk
1 1/2 cups chocolate chips
2 Tab. butter
1/2 tsp. salt
1/2 cup walnuts
2 tsp. vanilla

Put your apron on and...

Preheat your oven to 350 degrees. Beat together the butter, brown sugar, eggs, and vanilla for the crust in your mixer. Add in the rest of the crust ingredients. Pat 2/3 of the mixture into a
15 X 10 inch pan. I don't have a 10 X 15 inch pan. I use a 13 X 9 and it works OK.

In a saucepan, heat the milk, chocolate chips, butter, and salt till smooth. Remove from heat and add the nuts and vanilla.

Spread the chocolate, fudgey goodness over the cookie mixture in pan and then dot with the remaining oatmeal mixture. Bake at 350 for 25 to 30 minutes.


Saturday, September 17, 2011

Life's a Beach Cake

One of my girlfriends threw a super cute surprise Luau for her husband...and even managed to keep it a secret. She ordered this cake from me. We found the cake idea on family fun website I believe...but there are photos of this cake EVERYWHERE on line. I added my own twist. I added a gumpaste/fondant shark fin. I also added a little more dimension to the cake by adding the hill on the beach with an upside down cupcake. The sand is finely crushed graham cracker crumbs. I also used candy rocks...my original twist on the cake. Making the white caps on the waves took some trial and error. What worked for me was to smooth on the blue blue frosting with swirly motions. Then I pipe white swirly lines with frosting. Then I took a butter knife and smoothed the harsh white line into the blue frosting blending the two together. I bought the surf board, hula figurines, palm trees, and the beach chair at my local cake supply store. They were like .25 a piece. EASY cute cake that anybody could do!!!


Tuesday, September 13, 2011

How Bout them Apples? (Apple Cake Pops)

I am not a creative person. I cannot sit and draw something great. But...I can look at a simple drawing and copy it well. I cannot throw together a super cute outfit that awes a passerby. But...I can copy items from a picture and come across put together. I cannot design a cake from scratch but can copy a cute picture I found on pinterest relatively easily. If a customer asks for a teacher gift...I am like....duhhhh....emptiness....But...I can turn to Bakerella and copy her brilliantness (spell check tells me this is not a word...I don't care) quite well. Thank goodness for the talents of others. Right? I feel like I would be a blob of nothingness without the creativity of others to copy. Any one else out there like me??!!

I didn't feel right basically copying Bakerella's instructions here for these cute apple cake pops. So click here for hers. I made mine out of yellow cake and cream cheese frosting. They were delish. I put a square of Styrofoam at the bottom of each little terra cotta pot. The picture doesn't show it, but I loosely covered each individual cake pop with a small treat bag and tied a bow under each apple. It turned out super cute. It isn't too late for a Back to School gift for teachers!

Sunday, September 11, 2011

Pistachio Cake- My New Favorite Dessert...for the minute

I know...it's beautiful isn't it? Nuts, moist cake, chocolate....oh my! Seriously this is one of those recipes that I will make for the rest of my life. I got the recipe from a girlfriend of mine. She got it from her sister-in-law and it is their family favorite for get-togethers. I couldn't wait to try it. Paul says that he wants this to be his new birthday cake every year....can't wait till January...

Pistachio Cake
Source: Tanya Greaves

1/2 cup chopped nuts
1/2 cups chocolate chips
1 plain white cake
1 package instant pistachio pudding mix
1/2 cup sugar
1 cup water
1/2 cup vegetable oil
4 eggs
1/2 cup chocolate syrup
Shiny Chocolate Glaze


Grease and flour bundt pan. Sprinkle pecans and chocolate chips on the bottom of the pan. Blend together cake mix, sugar, pudding mix, water, oil and eggs. Remove 1 cup of batter to a separate bowl. Pour the rest of the mix (the majority) in the bundt pan. To the 1 cup of reserved batter, add the chocolate syrup...stir til blended. Pour over rest of the batter and swirl with a butter knife. Bake at 350 for 55 to 60 minutes. Cool 20 minutes before flipping over. Cool 20 minutes more and serve warm drizzled with shiny chocolate glaze.

Shiny Chocolate Glaze

2 T butter
2 T unsweetened cocoa powder
1/4 cup heavy whipping cream
1 1/2 cups powdered sugar
1 tsp. vanilla extract

Monday, September 5, 2011

Anybody-Can-Do-It Baseball Cupcakes

Effortless. Fast. Cute. These baseball cupcakes are a hit for any team of hungry cupcake lovers! I feel stupid even posting instructions! Simply spread on white buttercream smoothly with a small spatula. With red royal icing, in a bag with a number 2 tip, pipe on laces. Wa-La! You have a baseball. Batters Up!!


Thursday, September 1, 2011

EASY Fondant Ribbon Roses

Look!!! Twice in a week! And...I already started two other posts as promised! Oh yeah...baby, I am back! I have had the best week ever! Monday I went to the Def Leopard/ Heart concert. It was rockin'!! I had a blast. A friend of mine got tickets and shared. Don't even know/usually appreciate rock, but I loved it! (I am a hard core country music fan....raised in Texas...all have an appreciation for country music. In high school, even the gangsters knew and respected the great George Strait when they weren't listening to good 'ol Tupac). Then, Wednesday night I saw Broadway Les Miserables. It was life changing. I have seen Wicked and The Phantom of the Opera. Les Miserables was so different. It was tragic and chilling and beautiful. SEE IT if you have the chance!

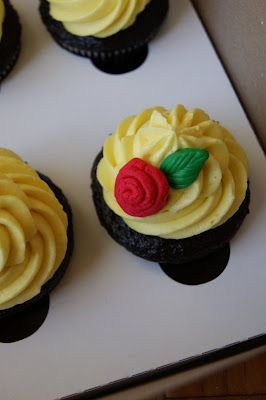
I made these cupcakes for a good friend of mine who is sadly moving. She loves this chocolate cake recipe more than anything else in life. (OK, that might be a slight exaggeration...)
It took me about 15 minutes to make the 6 roses.


Roll out your fondant super thin. Evenly cut it into 1/2 inch by about 3 inches long strips. With a brush, brush water along the top edge of the length of 1 strip.


Then fold this edge over onto itself. This helps the fondant crack less when you roll it up.


Roll each ribbon rose up starting at the short end. Pinch it between your thumb and pointer finger as you go, smoothing it down and helping it lay right. After it is rolled, I pinched off excess fondant from the underneath of each rose.


I have a great Wilton mold that I used for the leaves. You could just freehand cut them out of fondant. With a toothpick you can mark veins. You can also use a daisy shaped cookie cutter and cut off the points to use for leaves. Then mark veins accordingly.


Sunday, August 28, 2011

HOWDY YA'LL!!!

Ben's first day of kindergarten!


Auntie Lo Lo and Lukey Pookie


Ben. Skinny and white!


Me wake surfing behind my in-laws boat.


Wyatt and cousin Logan....to the rescue!!


I couldn't look at that picture of peanut butter bars one more time. Forgive my absence! Tis' the season I suppose. I notice a lot of other bloggers out there falling behind for one reason or another. I was on vacation!! When I went to Mexico, I had done some posts before I left for a friend to finish up for me. This vacation, I didn't even get that far. Yikes! We were in Utah spending time with family. Lots of sunshine on the lake. My family had our 6th Annual Keith Family Amazing Race. It was so fun. We jet- skiied, visited Lagoon( an amusement park in Utah), bowled with the kiddos and camped at Pineview Reservoir. Utah really is beautiful. We ate also. Boy did we eat!!! I think my favorite thing on the race that I ate was a cold meatloaf sandwich. AMAZING! Don't knock it til' you try it folks! I will share that recipe with you soon. When we got back last Sunday, it was time to get Ben ready for his first day of kindergarten. I didn't cry, but he did look like a little baby walking into that classroom. He loves his teacher and is getting used to going to school. It feels good to be on a schedule again. One more week until my preschool opens up... yeah! And I look forward to blogging this week! I will be sharing with you some baseball cupcakes, pistachio cake, some back to school cake pops, and a cute and simple cupcake topper ribbon rose. Stay tuned and forgive my absence...I will make it up to you!

Thursday, August 11, 2011

The Easiest, Fastest, most Deliciousest Chocolate Peanut Butter Bars

Fast, easy, no turning on the oven...bu-yah! These bad boys are creamy and light (well, according to me...). Believe it or not...this is the first time I have made peanut butter bars. I am sure they are a staple for most, where have I been. But, if you have been lost in the world like me, here is a ggrreaat (said like Tony the Tiger) recipe for ya! I made these for my company the other day along with a raspberry chiffon pie that took me hours, 3 steps, homemade crust, boiling raspberries, etc. The peanut butter bars were gone in an instant and the pie was a disappointment. So, here you have it....drumroll please....the winner of the backyard BBQ desserts ....

Chocolate Peanut Butter Bars
Source: The Brown Eyed Baker

1/2 cup butter
3/4 graham cracker crumbs
1 3/4 cup powdered sugar
1 cup peanut butter
1/4 cup butter
1/2 cup semi-sweet chocolate chips

Line an 8 X 8 pan with foil or parchment paper. Butter the insides. Melt the 1/2 cup butter in a saucepan. When it is melted, stir in powdered sugar til smooth. Add in the peanut butter and crumbs. Press into the bottom of the pan firmly.

Melt the 1/4 cup butter and chocolate chips in a saucepan til smooth. Spread evenly over the top of the peanut butter layer. Chill til set about 30 minutes. Store these in a container with a lid. In my photo you will notice spots on the top of my bars...this is from not covering them.


Related Posts Plugin for WordPress, Blogger...