Tuesday, September 13, 2011

How Bout them Apples? (Apple Cake Pops)

I am not a creative person. I cannot sit and draw something great. But...I can look at a simple drawing and copy it well. I cannot throw together a super cute outfit that awes a passerby. But...I can copy items from a picture and come across put together. I cannot design a cake from scratch but can copy a cute picture I found on pinterest relatively easily. If a customer asks for a teacher gift...I am like....duhhhh....emptiness....But...I can turn to Bakerella and copy her brilliantness (spell check tells me this is not a word...I don't care) quite well. Thank goodness for the talents of others. Right? I feel like I would be a blob of nothingness without the creativity of others to copy. Any one else out there like me??!!

I didn't feel right basically copying Bakerella's instructions here for these cute apple cake pops. So click here for hers. I made mine out of yellow cake and cream cheese frosting. They were delish. I put a square of Styrofoam at the bottom of each little terra cotta pot. The picture doesn't show it, but I loosely covered each individual cake pop with a small treat bag and tied a bow under each apple. It turned out super cute. It isn't too late for a Back to School gift for teachers!


Sunday, September 11, 2011

Pistachio Cake- My New Favorite Dessert...for the minute

I know...it's beautiful isn't it? Nuts, moist cake, chocolate....oh my! Seriously this is one of those recipes that I will make for the rest of my life. I got the recipe from a girlfriend of mine. She got it from her sister-in-law and it is their family favorite for get-togethers. I couldn't wait to try it. Paul says that he wants this to be his new birthday cake every year....can't wait till January...

Pistachio Cake
Source: Tanya Greaves

1/2 cup chopped nuts
1/2 cups chocolate chips
1 plain white cake
1 package instant pistachio pudding mix
1/2 cup sugar
1 cup water
1/2 cup vegetable oil
4 eggs
1/2 cup chocolate syrup
Shiny Chocolate Glaze


Grease and flour bundt pan. Sprinkle pecans and chocolate chips on the bottom of the pan. Blend together cake mix, sugar, pudding mix, water, oil and eggs. Remove 1 cup of batter to a separate bowl. Pour the rest of the mix (the majority) in the bundt pan. To the 1 cup of reserved batter, add the chocolate syrup...stir til blended. Pour over rest of the batter and swirl with a butter knife. Bake at 350 for 55 to 60 minutes. Cool 20 minutes before flipping over. Cool 20 minutes more and serve warm drizzled with shiny chocolate glaze.

Shiny Chocolate Glaze

2 T butter
2 T unsweetened cocoa powder
1/4 cup heavy whipping cream
1 1/2 cups powdered sugar
1 tsp. vanilla extract

Monday, September 5, 2011

Anybody-Can-Do-It Baseball Cupcakes

Effortless. Fast. Cute. These baseball cupcakes are a hit for any team of hungry cupcake lovers! I feel stupid even posting instructions! Simply spread on white buttercream smoothly with a small spatula. With red royal icing, in a bag with a number 2 tip, pipe on laces. Wa-La! You have a baseball. Batters Up!!


Thursday, September 1, 2011

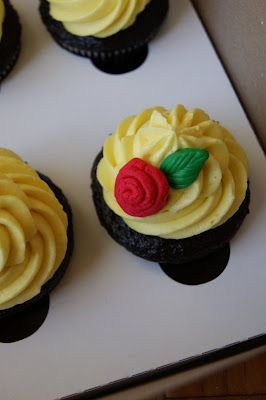
EASY Fondant Ribbon Roses

Look!!! Twice in a week! And...I already started two other posts as promised! Oh yeah...baby, I am back! I have had the best week ever! Monday I went to the Def Leopard/ Heart concert. It was rockin'!! I had a blast. A friend of mine got tickets and shared. Don't even know/usually appreciate rock, but I loved it! (I am a hard core country music fan....raised in Texas...all have an appreciation for country music. In high school, even the gangsters knew and respected the great George Strait when they weren't listening to good 'ol Tupac). Then, Wednesday night I saw Broadway Les Miserables. It was life changing. I have seen Wicked and The Phantom of the Opera. Les Miserables was so different. It was tragic and chilling and beautiful. SEE IT if you have the chance!

I made these cupcakes for a good friend of mine who is sadly moving. She loves this chocolate cake recipe more than anything else in life. (OK, that might be a slight exaggeration...)
It took me about 15 minutes to make the 6 roses.


Roll out your fondant super thin. Evenly cut it into 1/2 inch by about 3 inches long strips. With a brush, brush water along the top edge of the length of 1 strip.


Then fold this edge over onto itself. This helps the fondant crack less when you roll it up.


Roll each ribbon rose up starting at the short end. Pinch it between your thumb and pointer finger as you go, smoothing it down and helping it lay right. After it is rolled, I pinched off excess fondant from the underneath of each rose.


I have a great Wilton mold that I used for the leaves. You could just freehand cut them out of fondant. With a toothpick you can mark veins. You can also use a daisy shaped cookie cutter and cut off the points to use for leaves. Then mark veins accordingly.


Sunday, August 28, 2011

HOWDY YA'LL!!!

Ben's first day of kindergarten!


Auntie Lo Lo and Lukey Pookie


Ben. Skinny and white!


Me wake surfing behind my in-laws boat.


Wyatt and cousin Logan....to the rescue!!


I couldn't look at that picture of peanut butter bars one more time. Forgive my absence! Tis' the season I suppose. I notice a lot of other bloggers out there falling behind for one reason or another. I was on vacation!! When I went to Mexico, I had done some posts before I left for a friend to finish up for me. This vacation, I didn't even get that far. Yikes! We were in Utah spending time with family. Lots of sunshine on the lake. My family had our 6th Annual Keith Family Amazing Race. It was so fun. We jet- skiied, visited Lagoon( an amusement park in Utah), bowled with the kiddos and camped at Pineview Reservoir. Utah really is beautiful. We ate also. Boy did we eat!!! I think my favorite thing on the race that I ate was a cold meatloaf sandwich. AMAZING! Don't knock it til' you try it folks! I will share that recipe with you soon. When we got back last Sunday, it was time to get Ben ready for his first day of kindergarten. I didn't cry, but he did look like a little baby walking into that classroom. He loves his teacher and is getting used to going to school. It feels good to be on a schedule again. One more week until my preschool opens up... yeah! And I look forward to blogging this week! I will be sharing with you some baseball cupcakes, pistachio cake, some back to school cake pops, and a cute and simple cupcake topper ribbon rose. Stay tuned and forgive my absence...I will make it up to you!

Thursday, August 11, 2011

The Easiest, Fastest, most Deliciousest Chocolate Peanut Butter Bars

Fast, easy, no turning on the oven...bu-yah! These bad boys are creamy and light (well, according to me...). Believe it or not...this is the first time I have made peanut butter bars. I am sure they are a staple for most, where have I been. But, if you have been lost in the world like me, here is a ggrreaat (said like Tony the Tiger) recipe for ya! I made these for my company the other day along with a raspberry chiffon pie that took me hours, 3 steps, homemade crust, boiling raspberries, etc. The peanut butter bars were gone in an instant and the pie was a disappointment. So, here you have it....drumroll please....the winner of the backyard BBQ desserts ....

Chocolate Peanut Butter Bars
Source: The Brown Eyed Baker

1/2 cup butter
3/4 graham cracker crumbs
1 3/4 cup powdered sugar
1 cup peanut butter
1/4 cup butter
1/2 cup semi-sweet chocolate chips

Line an 8 X 8 pan with foil or parchment paper. Butter the insides. Melt the 1/2 cup butter in a saucepan. When it is melted, stir in powdered sugar til smooth. Add in the peanut butter and crumbs. Press into the bottom of the pan firmly.

Melt the 1/4 cup butter and chocolate chips in a saucepan til smooth. Spread evenly over the top of the peanut butter layer. Chill til set about 30 minutes. Store these in a container with a lid. In my photo you will notice spots on the top of my bars...this is from not covering them.


Thursday, August 4, 2011

Sassy Shoe Sugar Cookies


A girlfriend can never have too many shoes...right? I did these for a retirement party for a friend. The retiree had worked in the women's shoe department for Macys. (HELLO!!! DREAM JOB!) I made 4 dozen shoe cookies and every single one was different...it was sooo fun! Some were polka dotted, some were swirled, some were glittery red Dorothy shoes. It was a great creative outlet. I always recommend to not work with more than 4 colors or the pain in the butt royal icing process becomes WAY more painful. I did hot pink, red, white, and black. Thought those were fun shoe choices...I know I love my red pair of flats!!


Related Posts Plugin for WordPress, Blogger...