Tuesday, May 31, 2011

Whoop there it is!


Seriously. What is better than a hard game of basketball? Eating a nice soft sugar cookie right when you're done. You need to replenish all of those calories you just burned right? I like to eat one right before too, you know, for added energy. Ok. We all know that I pretty much can justify ANY situation to eat sugar. It is the inner 12 year old that I am trying to channel. I was asked to make these cookies for a youth basketball team and I think they turned out pretty darn cute. I won't tell you that my first cookie I actually decorated as a baseball thinking that it was a basketball. I actually had to google the image of a basketball ( there is my helpful tip for the day, google!) No matter how they came about, they turned out great and made a lot of 12 year old boys very happy! (and maybe a little hyper, I'm just sayin)

So I have posted my sugar cookie recipe before and you can find it right here. I like to use my favorite go to cream cheese frosting to make these cookies out of this world! I like to add about 1/4 cup of whipping cream to soften it up and give it a little lighter taste. I took a chance and tried royal icing on top of the cream cheese frosting and lo and behold, it worked! I would probably only try it on really basic cookies that have a simple design and only one color though!

There you have it. My cookie making skills trump my basketball skills and I am totally fine with that!

Saturday, May 28, 2011

Bibbity Bobbity Boo


In honor of the "Royal Wedding"(sorry, just thought that should be capitalized and in quotations) I thought that I would post a picture of a cake that I made for a princess that is as equally stunning as the Duchess herself! But first I had to share this little beauty that I found on facebook. Seriously so funny!


So, once again I had a bit of a learning curve with the fondant so let me share some do's and don'ts with y'all (you do know I am from Texas right? Just thought I'd share!) I used a whipped cream frosting again because the taste cannot be beat, but it definitely makes for some more challenging decorating. I initially made the stripes on the cake with pink fondant, but I put it on the night before and the pink bled onto the frosting, (lesson learned!) so you need to wait and apply to a nice crisp buttercream frosting if you are using fondant detailing. I ended up piping the dots and stripes with royal icing. The pink circle on top is also made from fondant. I am signed up for yet another class where I will be learning a lot more about fondant and I am so excited to share what I learn with y'all (there I go again!)

Until then, happy experimenting!

Tuesday, May 24, 2011

Pomp, Circumstance and some dang cute sugar cookies!


Hip Hip Hooray for the class of 2011! Oh how I would have loved to have had these cute cookies for my graduation about a decade a couple of short years ago. These cookies were super easy to do and would make a great party favor at a graduation party! These cookies I made were for exactly that. One of my greatest customers!

I thought it would be fun to change things up and do a couple of different backgrounds. So after I flooded the cookies and the icing was still wet, I added the polka dots, stripes, and plaid patterns with stiff white royal icing and voila! There you have a fantastically professional and adorable graduation goodie!


Sunday, May 22, 2011

"V" is for violet...roses that is!

I have been posting a lot of cakes lately! Which means I have been baking a lot of cakes lately. Which means I hope I can still fit in my new swimsuits next week in Mexico!!! Oh yeah baby!! One week from tonight I will be holding my hubby's hand, gazing out at the ocean, feeling the sand between my toes, and hearing the waves crash against the shore. Sigh! I can smell the salt in the air! I have some posts lined up to share with you while I am gone. And this week I have to do one more Countdown to Mexico post! Right?! Maybe some homemade churros...

This cake was my final project from Cake Decorating 101. My pearl/snail trail border is not so pretty, but check out my roses! My class was a little confused why I wrote a letter "Vv" on the cake. It was for preschool snack the next day and we were learning all about the letter Vv. (Also why I chose to make purple, or shall we say violet roses?) The kids loved it! They loved to eat a flower.

These Wilton roses are hard to master. I took this class almost two months ago and have made quite a few roses. Yet, still only half of my rose creations are passable. Practice makes perfect. Check out this tutorial here and get practicing!!!

Friday, May 20, 2011

Yikes! My first three tiered cake...

Don't Laugh??!!! No, this bad boy was not supposed to be a topsy turvy cake...it just kind of ended up that way. I said...STOP LAUGHING!!! I learned a lot of lessons from this cake. First, my friends are so kind, supportive, appreciative, and generous! Thanks for making me feel good when I try so hard and don't like the result! Second...leveling each cake layer is essential. Third, structural support for a tiered cake...not that hard. Really...you can do it.

Here is where I went wrong... With each layer of cake I was not a perfectionist. I thought, "well, if it is a little cock-eyed, I will make the second layer a little cock-eyed and they will fit like a puzzle." WRONG! If one layer is crooked, your whole cake will be crooked. Lesson learned. Make sure each tier of the cake is perfectly level before you stack. When stacking, mark the center of the first layer before you just plop the second layer on. I mean really... you are all thinking this is common sense. But...hey...just sharing with you my mistakes. And if I made them...maybe someone else out there is as inexperienced as I am. Can't wait for my next cake class that goes into all this a little better. If you are splitting each layer of cake...split to perfection. Before you start carving away, pop the cake in the freezer for 10 minutes or the fridge for a half hour (wrapped in Saran wrap). A cold cake is easier to level. It crumbles less and is easier to move around, stack, assemble, frost, etc. Keep each section refrigerated till you are ready to work with it. I learned this tip in a cake decorating book.

After I frosted the bottom/first tier, I cut wooden dowels the same height as the first layer. The bottom layer was a ten inch cake. I stuck the dowels in a 6 inch circle in the center of the cake. The next layer of cake was an 8 inch cake. After that was frosted, I put the dowels in a 4 inch circle in the center of that layer. I topped my crooked cake with a 6 inch cake. Chocolate cake with chocolate frosting. She decorated the cake with fresh fruit. It was for her daughter's Wedding Luau -themed birthday party. You got to meet this little gal-7 years old (I think) going on 16 years old! What a doll!


Wednesday, May 18, 2011

A Twist on Ladybug Cupcakes

Look! Two posts in one week...and the week isn't even over yet! Hold on to your hats!!! These ladybug cupcakes are EVERYWHERE! But...I thought I would post these since I put a little twist on mine. I bought little candy rocks and little candy daisies to put on the grass along with the ladybugs. Super cute!!! See the source, Martha Stewart for her "how-to." She uses Swiss Buttercream Frosting. I used cream cheese frosting. Hers stands up better and looks better. But...you need to know that making the ladybugs is a little time consuming and tedious. Give yourself plenty of time!


Sunday, May 15, 2011

Yet another week of craziness here. Watched 6 kiddos Monday thru Friday, taught preschool two days, went to my cake class, and did all the other normal every day acts of mothers/ women everywhere. How do we do it gals!!?? I did 6 orders this weekend! The Bakery Box is busy folks! I am having so much fun! Can't wait to share with you some of my orders. Aren't these super cute?! They were so fun and easy to do also. I made 24 flowers in a little over 1 hour...worth it.

You will need:
small and large daisy cookie cutter
pink fondant or gum paste with pink petal dust
plastic easter eggs

First roll out your fondant or sugar paste. I used half sugar paster, half fondant. Mine was white and I brushed it with pink petal dust. Cut equal amounts of large and small daisies. With a dot of water, place a small daisy on the top of a large daisy. Place each flower in half of a plastic easter egg or a flower former. They will dry curled. Dot with royal icing in the centers. The cutest cupcake toppers EVER!!


Sunday, May 8, 2011

Key Lime Tarts

Happy Mother's Day!!! Today at church, the speaker held up a sign that said MOM. Then she flipped it upside down to have it say WOW. She talked about all the women in her life that make her go, "WOW!" It made me think of the women in my life. My own mother, who looking back, I realize how special she was. Now I know what a sacrifice it is to make time for your little ones. She was so good at this. Seriously, I remember whole days of her playing board games with us. And I remember her reading to us nightly. I can list the novels we read aloud to this day. Time...the best thing she could ever have given me.

Then, there are my friends, the women around me. All of them truly trying every day to be the perfect wife, mother, daughter of God. WOW!

My sistas...loyal to a fault. One is a mother. ALWAYS talking about her children and how she can do better. One is a teacher who loves her students like they are hers. One is single who is becoming a woman who can love deeper than most.

At my tea party (my last two posts) , I had art of mothers and quotes about mothers in frames throughout the rooms... One said, "Live a joyful life with your children. Someday you will treasure these moments like precious gems gleaming with the luster of years well spent." I am in it NOW. It is great to have Mother's Day to remember how special and important my little job with my boys is.

My boys sure did love these tarts. They squirted whipped cream on them and devoured them. My tarts didn't turn out looking like the picture of perfection...spray your tart pans a little more than I did...but MAN...they were yummy!!

Key Lime Tarts
Source: Martha Stewart

Throw the following ingredients into your cart...

9 to 10 graham crackers (crushed) (put them in a ziplock bag and have your kiddos go to town on it)

2 Tab. plus 1/2 cup sugar
4 Tab. butter, melted
1 can sweetened condensed milk
3/4 cup fresh lime juice
4 large egg yolks
Pinch salt

Put your apron on and get busy...

Preheating your oven to 350 degrees. Crush your graham crackers into fine crumbs. You could use a food processor. Add butter and 2 Tab. sugar and combine. Press into bottom and sides of tart pans. Mine made about 25 small tarts. Spray pans well. I lightly sprayed mine and my tarts still had a hard time sliding out. Next time...I will spray them heavily. Bake a 9 inch crust for about 10 minutes or my little ones baked for about 5 minutes. (until crust is fragrant) Remove from oven to add inside.

Meanwhile, in a medium bowl, combine milk, lime juice, egg yolks, remaining 1/2 cup sugar and salt. Whisk until smooth. Pour mixture into each crust leaving 1/8 inch at the top. Return to oven and bake until filling is set. A 9 inch crust for about 20 minutes, my little ones took about 15 minutes.

Cool completely. Serve chilled.

Thursday, May 5, 2011

Cucumber Sandwiches


... A few more glimpses into the tea party. I can't believe Mother's Day is this Sunday!!! Every year for Mother's Day I go to Home Depot and return with a car load of flowers for the yard. This is the best gift. They last all season, enhance your home, and it really takes the pressure off of the good ol hubby. Now all he has to do is let me "sleep in" on Sunday and basically be my maid for the day...not that hard to satisfy, now am I??!! There is nothing better than enoying someone else's food on Mother's Day. These sandwiches sure were fresh and yummy and enjoyed by the moms who sampled them.


Cucumber Sandwiches


Source: my friend Julie Held found this recipe I think on allrecipes


1 8 oz. block cream cheese


3 Tab. mayonnaise or sour cream


1 packet ranch dressing mix


1-2 English cucumbers


1 -2 loaves of bread...I used white


dillweed for sprinkling over cut sandwiches


Julie recommended mixing the sandwich spread up the night before to really let the ranch mix marinate. Pull mixture from fridge an hour or so before making the sandwiches to soften up. Spread on 2 slices of bread. Thinly slice cucumber. No need to peel. Stack the cucumbers on 1 slice of bread 2 or 3 cucumber slices high. Top with another bread slice. You can cut sandwiches diagonally or use cute cookie cutter to fancy them up even more. Sprinkle cut sandwiches lightly with dillweed.


Tuesday, May 3, 2011

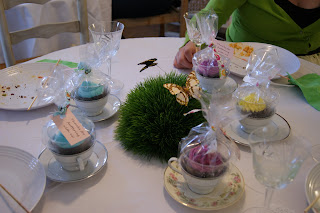
What I have been up to...planning a TEA PARTY!


Wish you could have come???!!! I would have loved to have had you!! I was so busy last week getting ready for this Mother's Day Garden Tea Party that I seriously didn't think of much else!! Forgive me. The Bakery Box shall never be put on the back burner again. Keep coming back...promise to post lots more.

That being said...a month or so ago, I had this crazy thought that I should throw a party. Always wanted to go to a fancy tea party...so I did it. And unlike so many things in my life that I build up to perfection and am then disappointed, this actually turned out beautifully. It snowed so Paul saved the day and moved all the furniture out of our main room to the garage. It ended up picture perfect. The mismatched wood chairs and china were so eclectic. I did all the baked goods but bought everything else. Thank goodness cause I had enough to think about. 2 new recipes to share with you that were a HUGE hit...cucumber sandwiches and yummy lime tarts. More tomorrow!! Which one will I share? 1 of these recipes and more picts from the party. I am going to do this every Mother's Day! Better start planning now...
Related Posts Plugin for WordPress, Blogger...