Sunday, January 30, 2011

Family Night Treats - January 31st- Dark Chocolate Cookies

I made these for my friend Julie a few weeks ago. She has been begging for more. Soft and chewy Dark Chocolate cookies with white and semi-sweet chips. Julie...you better order before they are all gone!

Like always...click the weekly menu tab for details.
I will share the recipe later this week.

Place your Valentine's Orders!!!

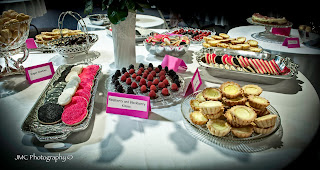
Strawberry flavored Rice Krispy Treats with Heart Marshmallows and White Chocolate Drizzling


Fancy Traditional Valentine's Day Sugar Cookies

Conversation Heart Sugar Cookies


Chocolate Sugar Cookie Heart Sandwiches
Do these make you want to host a Valentine's Day party!!?? I have some orders for the sugar cookies already for school valentines. Won't that be cute? A sugar cookie in a bag tied with a ribbon and a Sponge Bob/Star Wars/ Princess valentine attached??!! The talk of the classroom!! I think for Ben's class I will do the rice krispies or the sandwich cookies. Later this week I will be posting some cake pops that would be awesome for your little ones/boss/ secret admirer?!


Saturday, January 29, 2011

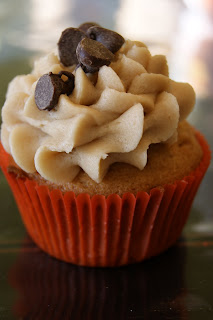
Oh My Gosh! Chocolate Chip Cookie Dough Cupcakes!!!

My little guy Ben loves cookie dough. When I ask him what his favorite food is he says, "cookie dough, ice cream, and pork chops! " I always let him eat the dough. I know, gasp...raw egg...I am a bad mom. Don't tell on me! He was obsessed with these cupcakes and... no raw egg! Seriously, you guys! I have been making cupcakes a few times a week and begging people to take them from me. All my taste-testers swore these were the BEST yet! The frosting on these bad boys tastes just like chocolate chip cookie dough. The cake is a moist chocolate chip cake/muffin. AND... the recipe calls for a cookie dough filling. After giving my husband a quick sample without the filling...he swore the filling would be too much and too sweet. We made ours without the filling. With, or without, this is one cupcake everyone will love!

Chocolate Chip Cookie Dough Cupcakes
Source: Annie's Eats
Yield:24 cupcakes

Put the following ingredients in your cart...
For the cupcakes:
3 sticks unsalted butter, at room temperature
1½ cups light brown sugar, packed
4 large eggs
2 2/3 cups all-purpose flour
1 tsp. baking powder
1 tsp. baking soda
¼ tsp. salt
1 cup milk
2 tsp. vanilla extract
1 cup chocolate chips (semisweet or bittersweet...I used half and half)

For the filling:
4 tbsp. unsalted butter, at room temperature
6 tbsp. light brown sugar, packed
1 cup plus 2 tbsp. all-purpose flour
7 oz. sweetened condensed milk
½ tsp. vanilla extract
¼ cup mini semisweet chocolate chips

For the frosting:
3 sticks unsalted butter, at room temperature
cup light brown sugar, packed
3½ cups confectioners' sugar
1 cup all-purpose flour
¾ tsp. salt
3 tbsp. milk
2½ tsp. vanilla extract

For decoration:
Tiny chocolate chip cookies
Mini chocolate chips

Put your apron on and...
Preheat the oven to 350° F. Line two cupcake pans with paper liners (24 total). In your mixing bowl combine the butter and brown sugar. Beat together until light and fluffy, about 3 minutes. Mix in the eggs one at a time, beating well after each addition and scraping down the sides of the bowl as needed. Combine the flour, baking powder, baking soda, and salt in a medium bowl. Stir together to blend. Add the dry ingredients to the mixer bowl on low speed, alternating with the milk, beginning and ending with the dry ingredients, mixing each addition just until incorporated. Blend in the vanilla. Fold in the chocolate chips with a spatula. Divide the batter evenly between the prepared cupcake liners. Bake for 18-20 minutes, until a toothpick inserted in the center comes out clean. Allow to cool in the pan 5-10 minutes, then transfer to a wire rack to cool completely.

To make the cookie dough filling, combine the butter and sugar in a mixing bowl and cream on medium-high speed until light and fluffy, about 2 minutes. Beat in the flour, sweetened condensed milk and vanilla until incorporated and smooth. Stir in the chocolate chips. Cover with plastic wrap and refrigerate until the mixture has firmed up a bit, about an hour.To fill the cupcakes, cut a cone-shaped portion out of the center of each cupcake. Fill each hole with a chunk of the chilled cookie dough mixture.

To make the frosting, beat together the butter and brown sugar in the bowl of a stand mixer fitted with the paddle attachment until creamy. Mix in the confectioners' sugar until smooth. Beat in the flour and salt. Mix in the milk and vanilla extract until smooth and well blended. Frost the filled cupcakes as desired, sprinkling with mini chocolate chips and topping with mini chocolate chip cookies for decoration.

Thursday, January 27, 2011

Clean Eating Thursday #4 - Veggie Packed Sloppy Joes

(Picture by Wylie Tidwell Photography)

My baby's first birthday was Tuesday. He was sick with an earache and couldn't have cared less. However, I figured I better make a big deal out of it for the big brothers and so that in the future Luke doesn't complain. I have a little sister (child #5 for my parents) who sometimes is bitter about the lack of pictures documenting her childhood in general. This little party had him in tears most of the meal. But he did enjoy his cake, or shall I say monster cupcakes. I will share them with you soon. I loved how simple they were. Anyways, I made this meal that night. Super good. I simplified the recipe like I often do with Clean Eating. But, we loved the results. I varied so much from the original recipe, I am calling this one an original! For instance, the original recipe called for bison, I used ground turkey. The original recipe had you making their marinara sauce, I used canned tomatoes, tomato paste, and some spices. I will never make Manwich again...this seemed so much healthier and guilt-free...and NATURAL.
Veggie-Packed Sloppy Joes
Loosely adapted from Clean Eating Magazine
Put in your shopping cart the following ingredients...
1 tsp. olive oil
1 1b. ground turkey breast (recipe called for ground bison, really you could use ground beef also)
3 cloves garlic, minced
1 medium onion, diced
2 tsp. chile powder
3/4 tsp. mustard powder
1/8 tsp. cayenne pepper
1 sweet red bell pepper
1 medium zucchini, diced
1 small eggplant (about 3/4 lb.) diced
2 carrots shredded
1 can diced tomatoes with juice (I used organic)
1/2 small can tomato paste
salt and pepper to taste
1 tab. honey or agave nectar
whole grain buns...I used the new thin, low calorie kind
Put your apron on and ...
Brown meat in skillet with olive oil. Add onion and garlic when meat is about half done. Add chile, mustard, and cayenne. (Mine was a little spicier than my boys like...next time I will be dialing down these spices...how do your kids like it? If they are bland eaters, try 1 tsp. chile powder, the mustard and called for, and leave out the cayenne.) Set meat mixture aside.
Saute bell pepper, eggplant, zucchini, and carrots about 5 minutes. Add meat mixture, tomatoes, and paste, and heat thoroughly. Test to make sure veggies are nice and soft. Add salt and pepper and honey to taste. Serve on toasted buns with forks. These put the sloppy in sloppy joes!

Tuesday, January 25, 2011

Cheese Muffins

Paul is a bread man. If there is fresh bread, rolls, etc. with dinner, he is already a happy man despite what is really placed in front of him. My boys have inherited this gene. Enter the cheese muffin...savory, not sweet. Thrown together in the mixer in 5 minutes, bake for 20...no yeast, no rising. No preplanning, rolling, no sweat. I hope they change your life like they have changed ours. Thank you pioneer woman!
Cheese Muffins
Source: Ree Drumond... The Pioneer Woman
Put in your shopping cart the following ingredients...
1 1/2 cups flour
1/2 Tab. sugar
1 Tab. baking powder
1/2 tsp. salt
3 cups shredded Colby-jack cheese (I use whatever I have...Cheddar, Swiss slices, whatever...)
1 cup milk
1 egg
1/4 cup melted butter
Put your apron on and get baking...
I mix together my dry ingredients first. Then I add the wet ingredients into the mixer. Mix well. I add my cheese last. Pour into greased muffin tin. Makes 12 muffins. Bake for 20 to 25 minutes in 375 degree oven. Test one to make sure they are not doughy inside.

Sunday, January 23, 2011

Family Night Treats- January 24th- And Owl Cookies

This week I am going to offer my chocolate chip cookies that I love for family night treats. I will also share the recipe with you! Check out the pricing under the weekly menu tab.

Also this week I am sharing some great Valentine's Day options, Clean Eating sloppy joes packed with veggies, cheese muffins, and chocolate chip cookie dough cupcakes! Check back in!

I won't leave you without a picture of some SUPER cute owl cookies I did back in December for party favors at a little girl's birthday party. I started watching this special little gal when she was two. She is in kindergarten now! Where did the time go? It makes me really sad. Her mom did a whole owl themed birthday party for her. I love how these turned out and they were so fun!

Friday, January 21, 2011

Cleaning Eating Thursday (on a Friday) #3 -Lentil Tacos

Better late than never is my motto! Time was not in my favor last night and I figured...why not have Clean Eating Friday this week?! This full-time mom/preschool teacher/daycare provider/taxi/maid/Bakery Box owner/ has been BUSY! But...good news today. The maids came! For any readers out there who are gasping right now (I am a little frugal) I got the maid service for free as part payment for my services for the wedding I did. Best thing EVER. My toilet paper was folded, my couches vacuumed, microwave cleaned...sigh...I better enjoy it for the one day it will last. I know what I want for my birthday/anniversary/Valentine's Day for now on!

Well, this meal will give you time for extra cleaning. I invented it. It was delicious, healthy, inexpensive, versatile, and lasted three nights and a lunch. The first night, I served the tacos pictured below, the second night I served the lentils over rice, and the third night I made a soup from it...throwing in whatever I had in my fridge. They were good all three ways.

I cannot technically claim this recipe to be "clean eating" due to the taco seasoning and the corn tortillas. HOWEVER...close enough...and here goes...


Lentil Tacos
Idea inspired by: my dear friend Julie Fletcher


Put in your shopping cart the following ingredients:


Taco seasoning
1bag brownish/green lentils


1 can black beans


1 can diced tomatoes


1 can corn


for garnish: black olives, shredded cheese, salsa, sour cream, chives, etc.


Put your apron on and ...


Cook 2 cups lentils according to package directions with about two to four tablespoons taco seasoning according to taste. Move to a large skillet (this makes a ton) and add canned corn, black beans, and tomatoes til warm. Serve in warmed corn tortillas and garnish however you like em. You won't miss the meat...my husband the carnivore loved all three versions of these lentils!

Wednesday, January 19, 2011

Chocolate Dipped Orange Slices

I have been stalking the computer last night and tonight for 5 minutes to blog. We are planning a trip to Mexico in May and like all decisions that must be made...Paul researches. When we needed to buy a car, a house, any electronic, tent, etc. Paul researches for days...sometimes weeks. He does a lot of checking things out at the store and coming home empty handed. Do you have a man in your life like this? Me? I am the opposite. I am the impulse buyer who lives with constant buyers remorse.

So...due to many more resorts that must be appraised, I chose these delights to share with you this evening. This is more of an idea than an actual recipe. I made five oranges the other afternoon that were instantly gobbled by hungry little people. They were a hit!

Chocolate Covered Orange Slices
Idea from: Paula Dean Holiday Baking Magazine

1 - 2 cups of chocolate-(I used a handful of dark chocolate chips and semi-sweet chocolate chips. You could use sweetened baking squares or cacao bars. Keep it dark chocolate and you can call these healthy!)

3-5 oranges

Peel and separate orange. Lay orange slices out on baking sheet covered with wax paper. Melt chocolate in microwave or double boiler. I always use the double boiler. Dip half of each orange section in chocolate and lay on wax paper. Set all orange slices in refrigerator for about 10 minutes til set. They will be gone instantly!


Monday, January 17, 2011

Lemon Blueberry Muffins

Last weekend was my husband Paul's 30th Birthday. I surprised him and took him indoor skydiving. What a blast! I took pictures while he and his long-time pal Mike "flew." It was a crackup. Next time, forget the cost...I am doing it!

Paul is a simple creature. All he wanted for his birthday was home cookin'. I couldn't convince him to go out. He requested these muffins the morning of his birthday. They are our favorites. I love the sugared tops and how rounded they turn out. Beauties! The hint of lemon in the muffins really add something! I double the lemon zest that the recipe calls for. Here is my version:
Lemon Blueberry Muffins
Source: Adapted from The Girl Who Ate Everything who got it from The Sisters Cafe

Put in your shopping cart the following...

2 cups flour
1/2 cup sugar
3 tsp. baking powder
1/2 tsp. salt
zest of two lemons
1 egg
1 cup milk
1/2 cup softened butter
1 cup frozen blueberries (I use fresh blueberries tossed in flour)

For the topping:
1/4 cup butter, melted
1/2 Tab. lemon juice
1/2 cup sugar

Mix dry ingredients and set aside. Beat eggs, milk, and butter. Add dry ingredients and stir to combine. Stir in blueberries gently. Bake at 375 degrees for 20-25 minutes in a sprayed muffin pan. Combine melted butter and lemon juice for the topping. While the muffins are still warm, dip the tops in butter concoction and dip LIGHTLY in sugar. Makes 12 muffins.

Sunday, January 16, 2011

Family Night Treats -January 17th! and a Giveaway Winner!!

And the give-away winner is Melanie Claridge!! Thank you all for your participation and support! Melanie will be receiving a one year subscription to Clean Eating Magazine. Enjoy it girl!!


Stay tuned each month for a giveaway. I have the CUTEST recipe binder to give away next month. PERFECT for all the recipes you have been printing out from blogs!


On to other business, this week the Family Night Treat is these scrum-diddly- umptious caramel shortbread bars. YUM!! Click on the weekly menu tab for specifics. Also added to the permanent menu...chocolate chip cookies. One hour notice required. Baked or frozen dough available.


Friday, January 14, 2011

Give-away #2 extended to Sunday!

Hello new friends! Check out the rules for the giveaway here . The give-away is extended to Sunday for all my facebook friends I just invited!

Thursday, January 13, 2011

A Wedding and Lemon Tarts


Remember right after Christmas I told you I was helping a friend with the desserts at her wedding? Well, it ended up beautiful, there was just the right amount of food, and I loved doing it! I learned that sugar cookies iced with royal icing freeze really well and I found this lemon tart recipe that I LO-OVE (that is love pronounced with two syllables! ) I learned how long it takes me to bake decorate, etc. 150 sugar cookies. (about a day and a half) I learned that my boys can really be occupied in front of the t.v. for strangely long amounts of time I can play games with my boys and still get everything done. :) Here is the DELICIOUS lemon tart recipe. Buy yourself some of these super cute tart pans. They are so cheap at Bed, Bath, and Beyond. Tarts are a great treat for more formal occasions like a fairy tea party (oh...or weddings). And I will be sharing tart recipes with you in the next few months. I am dying to break these little pans out again!


Lemon Tart Recipe


Put in your shopping cart the following ingredients:


Crust:

1 cup flour

1/3 cup powdered sugar

1/8 teaspoon salt

1/2 cup cold butter cut into pieces


Filling:

5 ounces cream cheese, room temp.

1/2 cup sugar

1/2 cup fresh lemon juice

2 large eggs

1 Tab. lemon zest


Topping:

1/2 cup heavy whipping cream

1 Tab. powdered sugar


Put on your apron and get busy baking...


Grease with butter (I used cooking spray) an 8 or 9 inch tart pan. (Or about 20 or so small pans like mine pictured)


For the crust:
Mix all ingredients in a food processor or your kitchen-aid/mixer til it forms one big clump. Press dough into and up sides of tart pans. Keep thin. Pierce bottom of each pan with a fork a few times to keep bottoms from rising too much. Preheat oven to 425 degrees. Cover and place the pans in the freezer for 15 minutes to chill. When pastry is chilled, place the tart pan/pans on a cookie sheet and bake until golden, about 13-15 minutes. (For small pans bake for 6-8 minutes.) Remove from oven and place on a wire rack to cool while you make the filling.
Reduce oven temperature at this time to 350 degrees or they will burn!
For the filling:
Mix all ingredients in your mixture til there are no lumps and mixture is perfectly smooth. Pour filling into pan/pans and bake for approximately 25 to 30 minutes or until filling is set. (For small pans bake about 10 minutes.) Cool on wire rack. I found it easiest to remove the little tarts from their pans while they were still warm to the touch.
Topping: (I didn't top my tarts)
Put mixing bowl and whisk in freezer for 15 minutes. Beat whipping cream and powdered sugar til stiff peaks form. Spread or pipe on the top of tart/tarts.
Refrigerate until you serve.

Tuesday, January 11, 2011

Give- Away Number 2!!!

( I borrowed this photo from www.cleaneatingmag.com... hope they don't mind!!!)

Hello Followers!!! In order to encourage each other in our New Year's Resolutions...I am giving away a year subscription to Clean Eating Magazine!!! You will love it! I don't know a single person who doesn't love to receive a magazine in the mail, let alone one that will encourage you to better health. Check out http://www.cleaneatingmag.com/ for samples and to get you excited. (By the way, I am not affiliated with them at all or paid by them. I am just a raving fan! ) Here are four ways to have your name entered in the drawing:


1. Get me 2 followers. Leave me a comment, call, or shoot me an email letting me know the 2 friends you had follow The Box.


2. Add my blog button (in my left sidebar) to your blog. Simply add it as a gadget in your design tab of your blog by copying and pasting the HTML code provided. Contact me with questions.


3. Make one of the recipes I have posted and leave me a comment letting me know how it turned out.


4. Add The Bakery Box to your Blog Roll.


Do all four, your name is entered four times. Do one of the four, your name is entered once, etc. The give-away deadline is Friday, January 14th 5:00 pm. The subscription will come straight to your house. And you will love it!!!

You asked for it...Nanaimo Bars!!!

These are as good as they look! And no baking required. Allow time for each layer to chill. I would say in the fridge these take a good 3 hours start to finish. I made mine in about an hour and a half using the freezer to speed each layer along. I am excited to have found these. They taste amazing, different, and look so fancy the way they hold their shape and are layered. I will be adding these to my suggested delights in my wedding binder. Imagine a chocolate graham cracker crust with coconut, then a chilled vanilla custard, almost nougat layer, topped with a thick chocolate ganache. Sigh! And so easy!

Nanaimo Bars
Source:The Happy Baker

Base:
1/2 cup butter
1/4 cup sugar
1/3 cup cocoa
1 egg
1 3/4 cups graham cracker crumbs
3/4 cup coconut

Filling:
1/2 cup butter, softened
3 Tab. milk
1 tsp. vanilla
2 Tab. custard powder or instant vanilla pudding mix (I used the pudding)
2 cups powdered sugar

Glaze:
3 Tab. butter
3/4 cup semisweet chocolate chips

Put on your apron and ...

Base:
In a medium saucepan, combine butter, sugar and cocoa; stir well. Add egg; cook and stir constantly over medium-low heat until mixture thickens. Remove from heat. Mix in cracker crumbs and coconut. Press into a greased 8 or 9 inch square pan. Chill til set. ( I stuck mine in the freezer for about 10 minutes while I was making the filling.)

Filling:
In a mixing bowl, beat together filling ingredients until light and fluffy. Spread evenly over base and chill. (I stuck mine in the freezer for about 30 minutes to 1 hour) (Until it is firm to the touch)

Glaze:
In a small saucepan over low heat (I always use a ghetto double boiler system I have. I boil 2 inches of water in a big pot, stick the chocolate in a smaller pot and put it in the water. This almost guarantees my chocolate won't melt.) Melt completely. Pour evenly over filling. Refrigerate (or speed freeze :) ) till cool and completely set.

Cut into cute squares and serve. They truly are beautiful.

Sunday, January 9, 2011

Family Night Treats-Monday January 9th


This week I am offering Nanaimo Bars. Ever heard of them? Me neither?! What a crime! Because these are GOOD! These are a no-bake bar with a graham cracker/chocolate/coconut crumb crust, a layer of thick custard, and a thick layer of chocolate ganache. Where have these been my whole life? These are WAY better than the average no-bake cookie we all make. Got to try it! Click on the weekly menu tab. for specifics! Call, comment, or email me with your orders.
Tune in this week for Give-Away #2! So exciting!
And maybe I will share this recipe with you all!

Berry Sour Cream Waffles

Are you a breakfast person? I believe there are two kinds of people in this world, those who go to bed at night thinking about what they are making for breakfast and those who get up in the morning , wipe the sleep from their eyes and pour a bowl of cereal. (OK...that sentence just made me think about a family classic..."What About Bob?" when Bob says, "There are two kinds of people in this world. People who love Neil Diamond and People who don't. My ex-wife loved Neil Diamond." HA! That show is a hoot!!!) ANYWAYS... I am a breakfast person (and I don't hate Neil Diamond f.y.i.). I had gestational diabetes with my last little guy and learned how much cold cereal sucks. I could only eat 1/4 cup cold cereal, or I cold have a waffle spread with peanut butter, or eggs with toast, or oatmeal with nuts. Needless to say, we had hot breakfast everyday and we have never turned back. SERIOUSLY!!! The only cereal I have in my cupboard is rice krispies (and I use these to make krispy treats!). Hop on the band wagon and start your day off right with something FILLING! These are our family favorite waffles (not the healthiest) (I will share those with you another time!)

Berry Sour Cream Waffles
Source: Lick the bowl good

Put in your shopping cart the following ingredients...

1 3/4 cups all-purpose flour
1 Tab. Sugar
1 Tab. baking powder
1/2 tsp. salt
8 Tab. (1 stick) butter, melted
1 cup milk
1/2 cup sour cream
3 large eggs
1 1/2 cups of fresh or frozen berries (I used raspberries and blackberries here.

Put your apron and get busy!

Preheat your waffle iron. Lightly spray the grids.
Meanwhile whisk the flour, sugar, baking powder, and salt in a large bowl to combine and make a well in the center.

If adding berries, add about 1/4 cup of the flour and coat berries to keep them from sinking to the bottom of the batter.

Whisk the melted butter, milk, sour cream, and eggs in a medium bowl until well combined. Pour into the well. Mix together until smooth. Gently fold berries into the batter.

Spoon about 1/4 cup of the batter into the center of each waffle quadrant. Cook waffle according to your waffle maker.

Serve hot with butter, syrup , jam...etc. I eat mine plain...THAT is how good they are!

Makes about 5 big waffles.

Thursday, January 6, 2011

Clean Eating Thursdays #2- Shepherd's Pie

I finally sat down last night and wrote my New Years Resolutions down. I am posting them right next to the computer since I sit down at the computer a couple times a day, yet it is kind of a private area. You know, strangers and preschool parents don't need to read all my weaknesses on the fridge! This year, besides my yearly goal to start to exercise (hey...I did get a lot better this year...) and read scriptures....etc...I have a lot of goals for my little businesses. At preschool I want more one on one focus with each child. I want to start taking baking and cooking classes this year also. I am taking a candy making class on January 30th...good start! And I want to ROCK THIS BLOG!!!! Is anyone out there reading it? Please start leaving comments, questions, recipe requests, etc. LET ME KNOW YOU ARE THERE!!! This weekend I will be having my second give-a-way...and next week I will be posting Valentines Day Treats you WILL want to order for SOMETHING!!!!
I got side-tracked...anyways...another goal of mine...refocusing on clean and healthy eating. This is one of my family's favorite recipes so far from Clean Eating. I just watched Food Inc. and next time think I might try substituting beans for the meat. Not saying I am going vegetarian...but...less meat would definitely benefit this fam.
Shepherd's Pie
Source: Clean Eating Magazine
Toss in your shopping cart the following ingredients...
1 lb. Yukon Gold Potatoes
1 clove garlic
2/3 cup buttermilk
1 Tab. Chives
Sea Salt and Pepper
4 tsp. olive oil
1 lb. ground turkey breast
1 yellow onion
3 medium carrots
1 celery stalk
1 tsp. fr. rosemary leaves
1 cup low sodium chicken broth
1 Tab. tomato paste
1/2 cup frozen peas
Put on your apron and get busy in the kitchen...
Preheat your oven to 375 degrees. Get water boiling in your big stock pot. Peel and cube your potatoes and toss em in with garlic clove. (I did this the first time and now when I make this, I omit this step and add garlic powder (gasp...shhh...don't tell) to the potatoes while I am mashing them for a stronger flavor).
While the potatoes are boiling till soft (15-20 minutes) I get my meat browning in a frying pan. Set Aside.
Then, heat 2 tsp. olive oil in skillet and add chopped veggies. Make these veggies small so they cook faster. Add rosemary to veggies when they are soft and add broth, meat, and tomato paste. Cook about 5 minutes til liquid thickens and then stir in frozen peas.
Transfer to a baking dish. Pat potatoes down on top. With a pastry brush, brush potato layer with olive oil to make your pie nice and pretty and brown. Bake for 30 minutes.


Shepherd's Pie. Clean Eating. Kid Tested. Mother Approved.
What are your resolutions? Are you going to learn something new this year? Let me know!


Wednesday, January 5, 2011

Homemade Gingersnaps

When I think of gingersnaps, I cringe. It has to do with bad associations for me. When I was pregnant and nauseous my doctor told me that snacking on gingersnaps would help. Willing to try anything I followed this suggestion every afternoon working at Kinkos. Ugh! Store-bought gingersnaps are so crispy and just a bit strong. Wish I had this recipe then....these are soft and subtle. My preschool kids devoured these on Tuesday for snack time which tells you they are not too strong! These kids are PICKY! If I am not going to be eating chocolate, I would make these, oh...or sugar cookies, oh...or snickerdoodles...or...
Homemade Gingersnaps
Source: Keith Family favorite for so long I have no clue where we got it from!
Throw in your shopping cart the following...
3/4 cup shortening
1 cup sugar
1 egg
1/4 cup molasses
2 cups flour
2 tsp. baking soda
1/4 tsp salt
1 tsp. cinnamon
1 1/2 tsp. ginger
Put on your apron and get busy...
Cream the first 4 ingredients together til smooth. Add dry ingredients and mix together. Roll 1 inch balls in sugar and bake at 350 degrees for 8 min. These are DELISH with vanilla ice cream and warm caramel sauce!

Sunday, January 2, 2011

I'm Back ...

And baking Family Night Treats!!! Click on the weekly menu tab for pricing and details...This week I am making homemade gingersnaps! Save yourself the hassle and order today!
Related Posts Plugin for WordPress, Blogger...